Construction Hints for the Paper-model of the Voison Laboratoire Racing Car
Updated: 30 May 2011
Home...
Help...
Search...
PaperModels...
Cars...
Construction Hints for the Paper-model of the Voison Laboratoire Racing Car
Body Alignment

- stick the bottom of the body to a stiff piece of cardboard or ply. This will largely prevent any twist from creeping in as you glue the sides and top together. Just use a few dots of glue, then once the body is complete and stiff you can easily cut it from the card or ply base. I printed out a second copy of the bottom and glued it over the glue marked bottom, as a cosmetic repair as well as a extra stiffener.
- I made some bulkheads out of scrap and glued them in place before attempting to glue the top in place. No pic, but I'm pretty sure I put one in behind the seat as well as the two up front. I also cut out a piece to match the top of the rear, and glued it over the rear bulkheads. This held everything in place while I glued the complex top panels down.

 = Wheels =
Wheels are always tricky. These skinny 1923 wheels even more so.
= Wheels =
Wheels are always tricky. These skinny 1923 wheels even more so.
- I glued the rim into a circle as normal

- then added a disk cut from scrap inside the rim, and glued it to the inside of the folded triangular tabs. This holds the rim into a good circle shape. A circle cutter is really good for this.
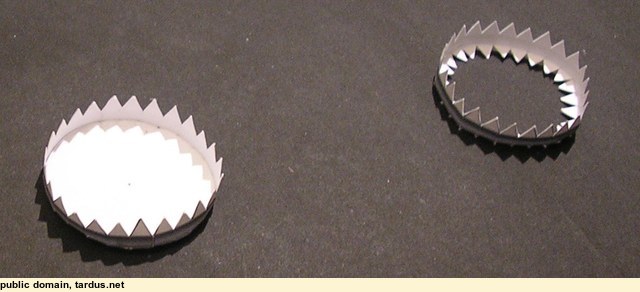

- then a rough cylinder from scrap, glued to the inside of the disk. This is just a spacer to support a second disk. When that is glued in place, you can fold the tabs on the upper edge of the rim down and glue them.

- Finally, just glue on the printed, decorative, wheel disks inside and out.
Home...
Help...
Search...
PaperModels...
Cars...
This page tardus.net/voisonHints.html
Last refreshed: 04 Oct 2023
About Tardus
Contact me, "Tardus"
Copyright
 powered by txt2tags
Search tardus.net
 Search...