


Home... Help... Search... OurHouse... Green...
Our Domestic Rainwater Tanks
We installed our rain water tanks in 2008, during a time of drought here in Australia, with sever water restrictions. Sydney Water were offering $500 to home owners who installed tanks, and another $500 if you then connected them to either your washing machine or your toilet cistern. $1500 all up if you connect to both.
I discovered that plastic (polyethylene) tanks are about the same price as Colorbond steel tanks, so went with them. I also discovered that circular tanks are much cheaper than oval and other compact shaped tanks for the same capacity, and that one big tank is a lot cheaper than several small ones.
The maximum capacity permitted my our local council without getting approval is 10,000 litres, but I could not fit one single 10,000 litre tank in any useful space on my small property, with its steep slope at the back. In the end we used 4 tanks of different sizes, all circular.
Total is therefore 9,700 litres
Here is a sketch plan:-

Here is the piping schematic diagram:-

The 2 small tanks are also connected by a 12mm balance line, so again they keep the same level. The green carport tank is not as tall as the red one, being on higher ground, but the tops of both tanks are at the same level. Apart from the occasional bucket of water from the tap on the side of the green tank, all its water flows across to the red tank.
The red tank is also connected to the main, rear tank-pair via a 12mm plastic line, so that water can drain by gravity to these tanks. As the red tank is on a higher level than the main tanks, there is a float valve which cuts off the water flow when the lower tanks are 300mm below full. After a dry spell, the 2 smaller tanks (which get rain from the northern side of the roof) are empty and the main tanks are low. When we do get rain (and we are getting plenty now, in later 2011) the southern roof fills the main tanks and the northern roof the smaller tanks, which immediately begin to drain in to the mains. This, approximately, allows all tanks to receive the maximum amount of rain possible, and has worked very well for over 3 years now.
New Pump and controller
The original pump failed after about 3 years - the stainless steel outer shell developed a crack and leaked. I replaced it with Davey high pressure pump with a "RainBank" controller, which allows for automatic switchover to mains water when the tank level is too low. It defaults to mains water, but when it detects flow above a very low threshhold and the tank level is above the minimum it starts the pump.
The pump is a stainless steel "Smoothflo" brand with a built in flow controller. When the downstream pressure drops (eg, you turn on a tap, or the toilet cistern empties and opens its inlet valve)) the pump starts up. It does not stop when the pressure builds up, but only when the flow rate has dropped below a minimum threshold. This gives a much more even delivery of water, and avoids the pumps cycling on and of rapidly, which would lead to more wear and tear on it, and possibly damage to the electric motor.
A pressure tank makes no sense with the Rainbank controller, so it was removed and found a home with a friend in the country.
Not essential, but useful, is a pressure "surge" tank. This has a rubber diaphragm with air under pressure on the dry side. It is connected off the side of the delivery pipe. About half its capacity is available BEFORE the pumps needs to start, again minimising pump start-stop cycles.

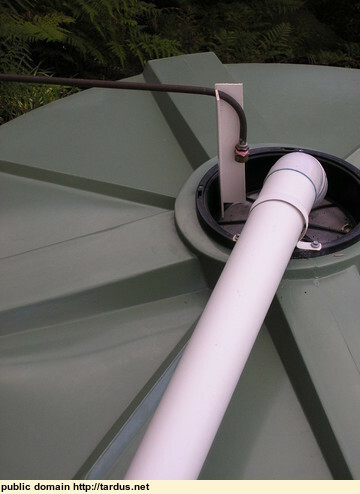
Here are the overflows from the main tanks. The small plastic pit set into the CCA treated pine tank stand has a 90mm drain pipe leading into the storm-water channel on our property.

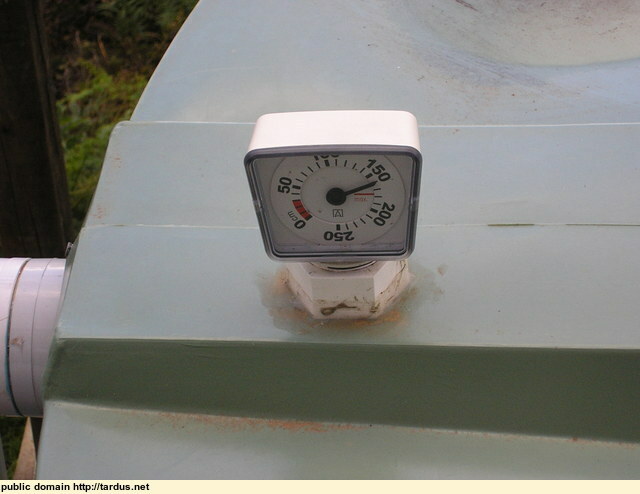
I installed a simple level gauge on the main tanks (only needs to be on the one, as they are piped together and therefore must always have the same level).

Here is a close-up of the level gauge. It uses a weighted float on a thin cord, wrapped around a spring-return pulley geared to the indicator dial.
This is inherent in the new Rainbank controller, so the original float switch and solenoid valve top-up was disconnected.
For the times when we run out of rainwater I installed an automatic top up from the town-water supply. A small float switch turns on a solenoid valve when the water level gets down to about 50mm, allowing water in a 2 litres a minute until the level rises by about 20mm. As the main tanks hold 4 litres per mm, this puts about 80 litres into the tank. The 2 litre per minute flow is mandated by Sydney Water, who supply our mains water. To achieve this I fitted a copper cap to the end of the 12mm pipe, with a hole drilled to restrict the flow. Size will vary according to your mains water pressure; mine was about 3mm. If too small, drill it larger; if too big, fill the hole with solder and drill smaller.

Our experience so far is that our 10,000 litre capacity is just about right - in 3 years there have only been maybe 20-25 days in which the top-up has come on. Our washing machine is a front loader that only uses 70 litres per wash, but it does a lot of washes a week (at least 10). Our toilet cistern is a low flush unit, dual-flush 3 or 6 litres.
These were made of treated pine.

Home... Help... Search... OurHouse... Green...
This page tardus.net/rainTanks.html Last refreshed: 04 Oct 2023
Contact me, "Tardus"
Copyright
 powered by txt2tags
